- How to use “real” UART
- Arduino’s Automatic Reset
- Linux always toggles DTR & RTS
- Espressif’s Automatic Reset
- Talking to Espressif’s Bootloader
- The ESP32-S2 reset pin
- Reproducing Espressif’s reset circuit
- The missing part of Espressif’s reset circuit
- Transistors in reverse and redundant circuits
- The serial TX path seems to be down
In my article about Espressif’s Automatic Reset, I briefly showed UART output from the bootloader, but did not go in more details. In this article, I want to go just a bit further, by showing some two-way interactions.

We’ll use the initial basic “real” UART setup. Note that I did not connect DTR/RTS to RST/IO0. This is intentional, because Espressif’s software will attempt to reset the board using these, expecting the transistor circuit mentioned before. If we try to connect them directly, the automatic reset will not work either. For the sake of clarity, we’ll just reset the board manually.
You can manually start the board in bootloader mode with the following steps:
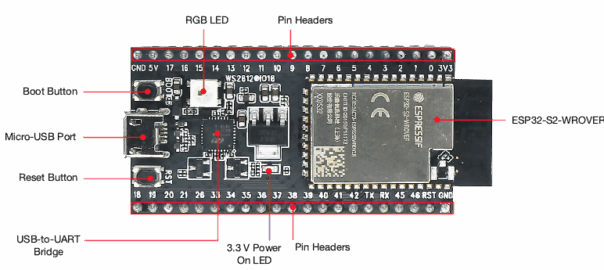
- Press and hold the “BOOT” button (on the ESP32-S2-Saola-1RI board)
- Press and release the “RST” button
- Release the “BOOT” button
You can check that this works by running tio while doing it:
$ tio -b 115200 /dev/ttyUSB0
[21:35:26.469] tio 3.9
[21:35:26.469] Press ctrl-t q to quit
[21:35:26.478] Connected to /dev/ttyUSB0
ESP-ROM:esp32s2-rc4-20191025
Build:Oct 25 2019
rst:0x1 (POWERON),boot:0x3 (DOWNLOAD(USB/UART0/1/SPI))
waiting for download
Note that you will want to exit tio before running the esptool commands below, or it will interfere.
Flash ID
I picked an arbitrary command for this tutorial, flash_id, which shows some information about the on-board flash memory. We’ll use Espressif’s official tool esptool.
Note: You can use espflash board-info with the same principles.
$ esptool --baud=115200 --chip=esp32s2 --port=/dev/ttyUSB0 flash_id
esptool.py v4.7.0
Serial port /dev/ttyUSB0
Connecting...
Chip is ESP32-S2 (revision v0.0)
Features: WiFi, No Embedded Flash, No Embedded PSRAM, ADC and temperature sensor calibration in BLK2 of efuse V2
Crystal is 40MHz
MAC: 68:67:25:2d:f6:a2
Uploading stub...
Running stub...
Stub running...
Manufacturer: 5e
Device: 4016
Detected flash size: 4MB
Flash type set in eFuse: quad (4 data lines)
Hard resetting via RTS pin...
In this article, I will highlight in yellow the important parts.
No Stub
Let’s look at three lines in particular:
$ esptool --baud=115200 --chip=esp32s2 --port=/dev/ttyUSB0 flash_id
esptool.py v4.7.0
Serial port /dev/ttyUSB0
Connecting...
Chip is ESP32-S2 (revision v0.0)
Features: WiFi, No Embedded Flash, No Embedded PSRAM, ADC and temperature sensor calibration in BLK2 of efuse V2
Crystal is 40MHz
MAC: 68:67:25:2d:f6:a2
Uploading stub...
Running stub...
Stub running...
Manufacturer: 5e
Device: 4016
Detected flash size: 4MB
Flash type set in eFuse: quad (4 data lines)
Hard resetting via RTS pin...
When the board starts in bootloader mode, it merely runs a different firmware than the user-provided one. That bootloader firmware is stored in read-only memory (ROM), so that it is always available, even if the user makes a mistake while uploading a new firmware. Without this, it would be easy to “brick” the chip. That is, put it in an unusable and unrecoverable state.
However, that also mean that this bootloader cannot be updated. If Espressif wants to develop new features in esptool, they might need to run some specific code on the chip. Thus, the ROM bootloader firmware has one very important feature: it lets the host computer send a new firmware to run immediately. This is the “stub”.
Once the stub has been uploaded, it will keep running until you reset the board:
~% esptool --baud=115200 --chip=esp32s2 --port=/dev/ttyUSB0 flash_id
esptool.py v4.7.0
Serial port /dev/ttyUSB0
Connecting...
Chip is ESP32-S2 (revision v0.0)
Features: WiFi, No Embedded Flash, No Embedded PSRAM, ADC and temperature sensor calibration in BLK2 of efuse V2
Crystal is 40MHz
MAC: 68:67:25:2d:f6:a2
Stub is already running. No upload is necessary.
Manufacturer: 5e
Device: 4016
Detected flash size: 4MB
Flash type set in eFuse: quad (4 data lines)
Hard resetting via RTS pin...
By default, esptool will upload the stub at every run, but we can actually run flash_id without that stub. To test this, we add --no-stub to the command.
Note: The previous command without –no-stub already uploaded a stub. To properly test –no-stub, you’ll need to reset the board. But you won’t see any difference in the output.
~% esptool --baud=115200 --chip=esp32s2 --port=/dev/ttyUSB0 --no-stub flash_id
esptool.py v4.7.0
Serial port /dev/ttyUSB0
Connecting....
Chip is ESP32-S2 (revision v0.0)
Features: WiFi, No Embedded Flash, No Embedded PSRAM, ADC and temperature sensor calibration in BLK2 of efuse V2
Crystal is 40MHz
MAC: 68:67:25:2d:f6:a2
Enabling default SPI flash mode...
Manufacturer: 5e
Device: 4016
Detected flash size: 4MB
Flash type set in eFuse: quad (4 data lines)
Hard resetting via RTS pin...
The three lines that mentioned a stub are gone, but the rest of the output is unchanged.
No reset
Now, I said that we did not connect DTR and RTS to avoid complications. But esptool is still trying to do it to reset the board after the command has been run:
~% esptool --baud=115200 --chip=esp32s2 --port=/dev/ttyUSB0 --no-stub flash_id
esptool.py v4.7.0
Serial port /dev/ttyUSB0
Connecting....
Chip is ESP32-S2 (revision v0.0)
Features: WiFi, No Embedded Flash, No Embedded PSRAM, ADC and temperature sensor calibration in BLK2 of efuse V2
Crystal is 40MHz
MAC: 68:67:25:2d:f6:a2
Enabling default SPI flash mode...
Manufacturer: 5e
Device: 4016
Detected flash size: 4MB
Flash type set in eFuse: quad (4 data lines)
Hard resetting via RTS pin...
We can prevent this with --after=no_reset:
~% esptool --baud=115200 --chip=esp32s2 --port=/dev/ttyUSB0 --no-stub --after=no_reset flash_id
esptool.py v4.7.0
Serial port /dev/ttyUSB0
Connecting...
Chip is ESP32-S2 (revision v0.0)
Features: WiFi, No Embedded Flash, No Embedded PSRAM, ADC and temperature sensor calibration in BLK2 of efuse V2
Crystal is 40MHz
MAC: 68:67:25:2d:f6:a2
Enabling default SPI flash mode...
Manufacturer: 5e
Device: 4016
Detected flash size: 4MB
Flash type set in eFuse: quad (4 data lines)
Staying in bootloader.
In fact, esptool also tries to reset the board before running the command, to put it in bootloader automatically mode. This is mostly the whole point of Espressif’s Automatic Reset. There is no line in the output telling us that this is happening. However, if we add --before=no_reset, we can see a warning:
~% esptool --baud=115200 --chip=esp32s2 --port=/dev/ttyUSB0 --no-stub --before=no_reset --after=no_reset flash_id
esptool.py v4.7.0
Serial port /dev/ttyUSB0
WARNING: Pre-connection option "no_reset" was selected. Connection may fail if the chip is not in bootloader or flasher stub mode.
Connecting...
Chip is ESP32-S2 (revision v0.0)
Features: WiFi, No Embedded Flash, No Embedded PSRAM, ADC and temperature sensor calibration in BLK2 of efuse V2
Crystal is 40MHz
MAC: 68:67:25:2d:f6:a2
Enabling default SPI flash mode...
Manufacturer: 5e
Device: 4016
Detected flash size: 4MB
Flash type set in eFuse: quad (4 data lines)
Staying in bootloader.
Note that, even with --before=no_reset --no-stub --after=no_reset, we cannot connect DTR/RTS to RST/IO0, because Linux always toggles DTR & RTS when opening the serial device, thus asserting RST (setting it electrically low) and preventing it to run.
No sync
There is actually one remaining option which is a bit less obvious.
For maximum reliability, the chip will try to detect the host’s baud rate. That is, you do not actually have to use 115200 as the baud rate:
~% esptool --baud=57600 --chip=esp32s2 --port=/dev/ttyUSB0 --no-stub --before=no_reset --after=no_reset flash_id
esptool.py v4.7.0
Serial port /dev/ttyUSB0
WARNING: Pre-connection option "no_reset" was selected. Connection may fail if the chip is not in bootloader or flasher stub mode.
Connecting.....
Chip is ESP32-S2 (revision v0.0)
Features: WiFi, No Embedded Flash, No Embedded PSRAM, ADC and temperature sensor calibration in BLK2 of efuse V2
Crystal is 40MHz
MAC: 68:67:25:2d:f6:a2
Enabling default SPI flash mode...
Manufacturer: 5e
Device: 4016
Detected flash size: 4MB
Flash type set in eFuse: quad (4 data lines)
Staying in bootloader.
You can see this happening if you connect another UART adapter instead of the ESP32-S2-Saola-1RI board (GND to GND, TX to RX, RX to TX, but do not connect VCC). esptool will of course fail to talk to the chip:
~% esptool --baud=115200 --chip=esp32s2 --port=/dev/ttyUSB0 --no-stub --before=no_reset --after=no_reset flash_id
esptool.py v4.7.0
Serial port /dev/ttyUSB0
WARNING: Pre-connection option "no_reset" was selected. Connection may fail if the chip is not in bootloader or flasher stub mode.
Connecting......................................

A fatal error occurred: Failed to connect to ESP32-S2: No serial data received.
For troubleshooting steps visit: https://docs.espressif.com/projects/esptool/en/latest/troubleshooting.html
However, some weird stuff will show up in the second UART device:
~% tio -b 115200 /dev/ttyUSB1
[21:53:17.913] tio 3.9
[21:53:17.913] Press ctrl-t q to quit
[21:53:17.923] Connected to /dev/ttyUSB1
$ UUUUUUUUUUUUUUUUUUUUUUUUUUUUUUUU�$ UUUUUUUUUUUUUUUUUUUUUUUUUUUUUUUU�$ UUUUUUUUUUUUUUUUUUUUUUUUUUUUUUUU�$ UUUUUUUUUUUUUUUUUUUUUUUUUUUUUUUU�$…
You can display as hexadecimal ASCII codes:
~% tio -b 115200 /dev/ttyUSB1 --output-mode=hex
[21:53:37.509] tio 3.9
[21:53:37.509] Press ctrl-t q to quit
[21:53:37.519] Connected to /dev/ttyUSB1
c0 00 08 24 00 00 00 00 00 07 07 12 20 55 55 55 55 55 55 55 55 55 55 55 55 55 55 55 55 55 55 55 55 55 55 55 55 55 55 55 55 55 55 55 55 c0 c0 00 08 24 00 00 00 00 00 07 07 12 20 55 55 55 55 55 55 55 55 55 55 55 55 55 55 55 55 55 55 55 55 55 55 55 55 55 55 55 55 55 55 55 55 c0 c0 00 08 24 00 00 00 00 00 07 07 12 20 55 55 55 55 55 55 55 55 55 55 55 55 55 55 55 55 55 55 55 55 55 55 55 55 55 55 55 55 55 55 55 55 c0 c0 00 08 24 00 00 00 00 00 07 07 12 20 55 55 55 55 55 55 55 55 55 55 55 55 55 55 55 55 55 55 55 55 55 55 55 55 55 55 55 55 55 55 55 55 c0 …
This is the same SLIP command repeated several times:
c0is the magic byte for SLIP (that is, all messages start with this byte)00indicates a request08indicates a “Sync frame”, which sounds consistent with what we are doing24 00indicates that the messages contains 36 (0x24) bytes of payload (0x07 0x07 0x12 0x20, followed by 32 x0x55)00 00 00 00are just unused bytes (checksum for some commands)07 07 12 20 55 55 55 55 55 55 55 55 55 55 55 55 55 55 55 55 55 55 55 55 55 55 55 55 55 55 55 55 55 55 55 55is the payloadc0is also added at the end of SLIP message
I am not sure about 07 07 12 2055 byte is to provide a very easily identified pattern for the chip to recognize without knowing the baud rate. Note that 0x55 is 01010101 in binary.
Since the chip might already be “synced”, this still need to be a valid SLIP message, not just a bare series of 55.
In any case, we can use no_reset_no_sync to skip all of this. The command will only succeed if the sync command was run previously:
~% esptool --baud=115200 --chip=esp32s2 --port=/dev/ttyUSB0 --no-stub --before=no_reset_no_sync --after=no_reset flash_id
esptool.py v4.7.0
Serial port /dev/ttyUSB0
WARNING: Pre-connection option "no_reset_no_sync" was selected. Connection may fail if the chip is not in bootloader or flasher stub mode.
Connecting...
Chip is ESP32-S2 (revision v0.0)
Features: WiFi, No Embedded Flash, No Embedded PSRAM, ADC and temperature sensor calibration in BLK2 of efuse V2
Crystal is 40MHz
MAC: 68:67:25:2d:f6:a2
Enabling default SPI flash mode...
Manufacturer: 5e
Device: 4016
Detected flash size: 4MB
Flash type set in eFuse: quad (4 data lines)
Staying in bootloader.
Otherwise, it will fail to talk to the stub:
~% esptool --baud=115200 --chip=esp32s2 --port=/dev/ttyUSB0 --no-stub --before=no_reset_no_sync --after=no_reset flash_id
esptool.py v4.7.0
Serial port /dev/ttyUSB0
WARNING: Pre-connection option "no_reset_no_sync" was selected. Connection may fail if the chip is not in bootloader or flasher stub mode.
Connecting...
^C
Higher baud rates
For more trivia, that always uses at most a value of 115200 baud. If you use a higher value, it will sync at 115200 baud, and then send a separate command to raise the baud rate:
~% esptool --baud=1000000 --chip=esp32s2 --port=/dev/ttyUSB0 --no-stub --before=no_reset --after=no_reset flash_id
esptool.py v4.7.0
Serial port /dev/ttyUSB0
WARNING: Pre-connection option "no_reset" was selected. Connection may fail if the chip is not in bootloader or flasher stub mode.
Connecting.....
Chip is ESP32-S2 (revision v0.0)
Features: WiFi, No Embedded Flash, No Embedded PSRAM, ADC and temperature sensor calibration in BLK2 of efuse V2
Crystal is 40MHz
MAC: 68:67:25:2d:f6:a2
Changing baud rate to 1000000
Changed.
Enabling default SPI flash mode...
Manufacturer: 5e
Device: 4016
Detected flash size: 4MB
Flash type set in eFuse: quad (4 data lines)
Staying in bootloader.

Leave a Reply